
Super White Quartzite Slab Approval For Export Projects
We had a 64-room hotel order where the sample board looked fine and the first approval email looked even better. Then the factory put the sink cutouts on the full slab layout. The strongest charcoal line ran through 19 of the planned front returns. The designer had approved a 300 mm crop. The factory had a 3.2 metre slab. Those are not the same decision.

I stopped the cutting list that afternoon. The project had already booked a 20GP container, and the site expected the first bathroom package in six weeks. Back in the day, people would call this a stone problem. It was not. It was an approval-record problem. Take it from me, a natural material only becomes difficult when the paper trail is weaker than the cutting plan.
A proper Super White quartzite slab approval gives everyone one version of the truth. It shows the slab number, its full face, the intended finished pieces, the revision date, and who released it. That record is useful when the first pieces are dry-laid, when the crates are packed, and when a site team opens the container months later.
Build Super White quartzite slab approval from the whole slab
I start with a clean full-face photograph, taken straight on with the slab number visible. I do not start with a phone crop, a sample, or a catalogue picture. The photograph needs a scale reference and a clear orientation. Left and right become important when a vanity top, a wall panel, or a waterfall return is being matched across several rooms.
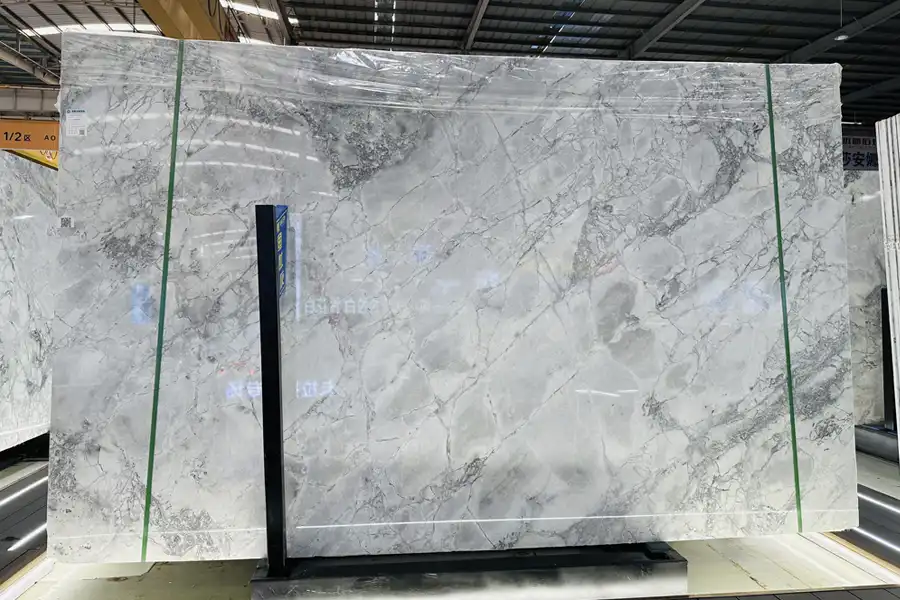
The landing page for Quartzito super branco is the right commercial destination, but the project release needs a more exact record. I mark each finished piece over the actual slab: countertop, backsplash, vanity deck, return, threshold, or wall panel. That is where we find out whether the movement will land in a useful place or disappear inside a sink opening.
Then I compare the marked photo with the final cut-to-size drawing. You cannot skip this step. A drawing may change after the stone selection. A basin can move 40 mm. A cabinet may become deeper. A wall panel may gain an outlet. Each change can move the cut line into a different part of the slab.
Check batch range before allocating rooms
Natural stone batch photos are not there to promise identical material. They show the actual range before the project commits to a room allocation. Super White can read cooler in one block and warmer in another, with different concentrations of grey movement. That is normal. The mistake is letting paired vanities or adjacent wall panels come from slabs that were never compared side by side.
For repeated bathroom units, I allocate the closest slabs to paired rooms first. More varied pieces can go into separate areas where they will not be compared across a door opening. The Laje de Quartzito Super Branco page gives the project a direct product reference, but it is the numbered batch set that protects the actual order.
I also record the approved finish. A honed face and a polished face can change how the grey movement reads under hotel lighting. If the mock-up uses one finish and the production release says another, you have a problem before the crate is even built. Put the finish beside the slab number, not in a separate email thread.
Release only a controlled cutting list
A cut-to-size approval should carry a revision number and a date. We have seen drawings with the same file name arrive from three different people, each with one small change. One moved a faucet. One changed the backsplash height. One changed the edge return. If the factory cuts from the wrong revision, nobody wins an argument by finding the right drawing later.
I keep the cutting list with the slab layout, not beside it. The layout tells us what the material will look like. The drawing tells us what it has to fit. The Bancada de Quartzito Super Branco page is useful when the specification includes worktops, but it cannot replace the project drawing that shows each cutout and finished edge.
The approval set I require before fabrication
| Record | What it must show | Risk it controls |
|---|---|---|
| Full-face slab photo | Slab number, orientation, scale, natural movement, and edges | Approving a crop that cannot support the finished layout |
| Marked layout | Every visible top, panel, return, opening, and seam | A vein or dark area landing inside a cutout |
| Batch board | All reserved slabs in the same orientation and lighting | Mismatch between adjacent rooms or paired pieces |
| Revision-controlled drawing | Latest dimensions, cutouts, edges, and issue date | Fabrication from superseded information |
| Release log | Named approver, date, drawing revision, and slab numbers | Unclear responsibility after cutting begins |
The Hard-Won Lesson: One missing revision cost eight vanity tops
A resort project changed from 18 mm tops with a separate splash to a built-up 40 mm front edge. The architect issued the new elevation, but the cutting sheet in the approval folder was the prior revision. Eight tops were cut with the old front return before dry-lay exposed the mismatch. The replacement delayed the first shipment by nine days and consumed the spare slab allowance.
The Lesson: Do not release a slab until the marked layout and the cutting drawing carry the same revision date.
Understanding slab release in today’s export projects
Why the full photo stays useful after cutting
The full photo does not retire once the factory starts. During dry-lay, we compare finished pieces against the approved cut zones. During packing, we use it to identify the best face for protection. When the site reports a concern, we return to the same record. That is why I keep every image readable and numbered.
How I stage the work from approval to crate
First, we lock the final drawings and slab allocations. Next, the factory cuts the pieces and arranges visible sets for dry-lay photographs. Then we compare those photographs with the release record before edge finishing and packing. After that, each crate receives its shipping mark, room or area reference, and photo record. Back in the day, people tried to solve these steps by memory. That does not scale across a mixed container.

What to do if a slab no longer fits the approved layout
Photograph the full slab and marked layout, stop cutting on that allocation, and contact the supplier with the original inspection records. Do not move the pieces to a different area without a documented decision. The first three steps are simple: record the condition, pause fabrication, and compare the actual material with the signed release.
The same discipline supports Natural Stone Project Procurement: The Complete Step-by-Step Guide for Export Orders. We are not adding paperwork for the sake of paperwork. We are keeping the project from finding a material conflict after the only usable slab has been cut.
Questions before a slab release
1. What is included in Super White quartzite slab approval?
It includes the full-face slab image, slab number, marked cut layout, batch comparison, finish, current drawing revision, and named release. The record needs to show how the visible material will become the finished project pieces, not merely that somebody liked a sample.
2. Are full slab photos necessary for a small order?
Yes, when a visible top, panel, or return needs controlled movement. A small order may have less spare material, which makes a wrong cut even harder to correct. The image also helps the fabricator and site team refer to the same material later.
3. How do I check batch variation in Super White Quartzite?
Place full images of all reserved slabs side by side in the same orientation. Compare overall warmth, movement density, and usable calm zones. Allocate the closest material to pieces that meet or sit in adjacent rooms.
4. When should the cutting list be signed?
After the final drawing, slab layout, and project finish are aligned. Do not sign a cutting list while cabinet dimensions, sink models, or wall openings are still changing. Those late changes can move a cut into the wrong part of the stone.
5. What should I do first if I spot a mismatch after dry-lay?
Take wide and close photographs, stop finishing or packing the affected set, and send the images with the approved layout to the supplier. Do not continue installation or substitution until the comparison is complete. That record gives the project a fair basis for the next decision.
Quick-Reference Checklist for slab release
- Request full-face images with slab numbers and scale references.
- Mark every visible finished piece before fabrication begins.
- Match the layout revision to the final cutting drawing.
- Compare all reserved slabs before allocating repeated rooms.
- Record the approved finish beside each slab number.
- Hold dry-lay photographs with the release record.
- Stop cutting when the slab no longer supports the signed layout.
Final Conclusion
Slab approval is the moment when a good-looking material becomes a buildable project package. I want the whole slab, the whole drawing, the batch range, and the release date in one folder before a blade touches the material. Take it from me, that is easier than trying to explain a preventable cut error after the spare pieces are gone.
Super White quartzite slab approval protects the design, the fabrication sequence, and the delivery record at the same time. You cannot skip this step. I would rather hold a release for one clear photograph than ask our FOR U STONE project partners to rebuild a room around the wrong cut.

Referências
- Dimension Stone Design Manual, Natural Stone Institute.
- Natural Stone Care Guide, Natural Stone Institute.
- ASTM C97 Standard Test Methods for Absorption and Bulk Specific Gravity of Dimension Stone, ASTM International.
- ASTM C99 Standard Test Method for Modulus of Rupture of Dimension Stone, ASTM International.
- Natural Stone Testing Standards, Stone Federation Great Britain.
- ISPM 15 Regulation of Wood Packaging Material in International Trade, International Plant Protection Convention.
- Search Essentials and Creating Helpful, Reliable, People-First Content, Google Search Central.